This tutorial will show how to build a two-node Hyper-V cluster using Powershell. The tutorial starts with two servers that both have Windows Server 2016 Datacenter (no Desktop Experience) installed. For this tutorial Windows Server 2016 Standard can be used as well. The advantage of the Datacenter edition is that you will have an unlimited amount of OSE’s (Operating System Environment) available. The Standard Edition has two OSE’s. More OSE’s must be licensed separately.
Hardware specifications
Networking
Both servers have three network interfaces connected to:
- VM’s + Management network
- iSCSI network
- Quorum network
Storage
Make sure that at least two shared storage (SAN) disks are available to both nodes. The SAN can be an iSCSI or Fibre Channel SAN. (If a Fibre Channel SAN is used, the iSCSI networkinterface is not required.)
- one or more disks for virtual machine files (for this tutorial a 60 GB disk is used)
- one small 1 GB disk that will be used as a Disk Witness for the Quorum.
To build a Microsoft iSCSI server that will host the shared disks for the Hyper-V cluster, use this post https://onkelx.nl/2018/10/23/creating-iscsi-luns-in-windows-server-using-powershell/ to build the Microsoft iSCSI server.
Software specifications
Server configuration:
- OS: Windows Server 2016, without Desktop Experience, joined to an Active Directory Domain named ‘lab01.local’.
- Node 1
- Hostname: HV04
- LAN IP-Address: 192.168.20.64/255.255.255.0; Default Gateway: 192.168.20.254
- iSCSI IP-Address: 10.0.0.64/255.255.255.0; Default Gateway: none
- Quorum IP-Address: 10.10.0.64/255.255.255.0; Default Gateway: none
- Node 2
- Hostname: HV05
- LAN IP-Address: 192.168.20.65/255.255.255.0; Default Gateway: 192.168.20.254
- iSCSI IP-Address: 10.0.0.65/255.255.255.0; Default Gateway: none
- Quorum IP-Address: 10.10.0.65/255.255.255.0; Default Gateway: none
Installing Hyper-V
All configurations will be done from a management server that has Windows Server 2016 Standard(with Desktop Experience) installed.
Logon to the management server and start a Powershell session as administrator. Put the hostnames of the two servers that are configured as Hyper-V servers in a variable.
$ServerList = 'hv04.lab01.local','hv05.lab01.local'
Install the Hyper-V and Failover-Clustering role
Install the roles
Two install the Hyper-V and Failover-Clustering roles (including the Powershell management modules) on both servers, use the following commands.
$FeatureList = 'Hyper-V','Failover-Clustering','RSAT-Clustering-PowerShell','Hyper-V-PowerShell'
Invoke-Command ($ServerList) -ArgumentList $FeatureList {Install-WindowsFeature $Args -Restart:$True}
The servers will reboot automatically because the ‘Restart’ switch is True.
Install Hyper-V Management Tools
To manage the Hyper-V nodes and the virtual machines, you can install the Hyper-V Management Tools on the management server. To install the Hyper-V Management Tools including the Powershell Module, use the following command.
Install-WindowsFeature RSAT-Hyper-V-Tools -IncludeAllSubFeature
Create and configure the Hyper-V cluster
Install Failover Clustering Tools Management Tools
To create, configure and manage the Hyper-V cluster, install the Failover Clustering Tools on the management server using the following command.
Install-WindowsFeature RSAT-Clustering -IncludeAllSubFeature
Before creating the cluster, validate the Hyper-V cluster candidates, run the following command.
Test-Cluster –Node $ServerList –Include "Inventory", "Network", "System Configuration"
This will create a Validation Report that can be found in the folder ‘C:\Windows\cluster\Reports’ on all nodes that were tested. Check the report for errors and fix them before the cluster is created.
To create the cluster, an unused ip-address is required. For this tutorial the ip-address ‘192.168.20.70’ is used.
The ‘New-Cluster’ cmdlet will create a computer object in the Active Directory. By default it will be created in the ‘Computers’ container, unless you changed the default location for new computer accounts. The cluster computer account can be moved after the creation of the cluster. It is also possible to create the computer account manually in the preferred container/OU. If the cluster computer account is created manually, make sure it is disabled, otherwise the creation of the cluster will fail. The ‘New-Cluster’ cmdlet will enable the cluster computer account when creating the cluster.
In this tutorial the cluster will be created without any cluster storage. The cluster storage will be configured later. To create the cluster named ‘HVCluster01’ and add the two Hyper-V servers (nodes) to it, use the following command.
New-Cluster -Name HVCluster01 -Node $ServerList -NoStorage -StaticAddress 192.168.20.70
The ‘New-Cluster’ cmdlet has created the cluster, created the cluster computer account or enabled the account if it was created manually and a DNS A-record has been created for the clustername and its ip-address. The servers that have been added to the cluster, are called ‘nodes’.
Because the cluster was created using the ‘NoStorage’ switch, a warning is shown. The warning can be found in the file ‘Create Cluster Wizard HVCluster01 on <date> At <time>.htm’ in the folder ‘C:\Windows\Cluster\Reports’ on the management server.
The warning is: “An appropriate disk was not found for configuring a disk witness. The cluster is not configured with a witness. As a best practice, configure a witness to help achieve the highest availability of the cluster. If this cluster does not have shared storage, configure a File Share Witness or a Cloud Witness.“
The warning can be ignored, because a witness disk is created later.
Rename Cluster Networks
To show the current cluster networks, use the following command.
Get-ClusterNetwork -Cluster hvcluster01 | select Name,State,Role,Address
The result will look like this.

Use the following commands to rename the cluster networks to more logical names.
(Get-ClusterNetwork -Cluster hvcluster01 | where Role -eq "ClusterAndClient").Name = "Cluster and Client Network"

(Get-ClusterNetwork -Cluster hvcluster01 | where Role -eq "None").Name = "iSCSI Network"

(Get-ClusterNetwork -Cluster hvcluster01 | where Role -eq "Cluster").Name = "Cluster Network"
Run the following command again to view the result.
Get-ClusterNetwork -Cluster hvcluster01 | select Name,State,Role,Address
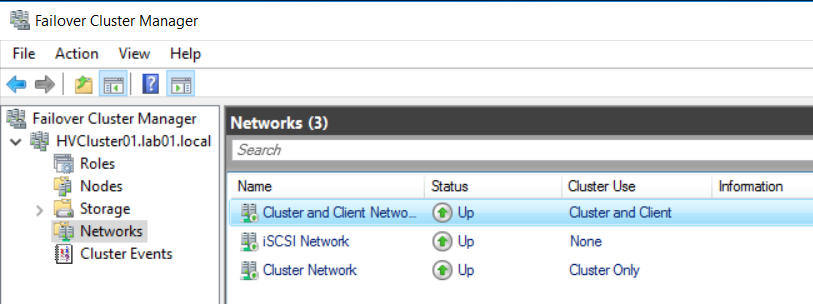
The result will look like this.

You can also view the changed names in the Failover Cluster Manager.
Prepare the cluster disks
The shared disks that have been added to the Hyper-V nodes as a prerequisite, are offline and have not been initialized. The initialization of the disks should be performed on one Hyper-V server. To show the shared disks on Hyper-V server ‘HV04’, use the following command to show all disks that are offline.
Invoke-Command -ComputerName hv04 {Get-Disk | where {$_.IsOffline -eq $true} | select DiskNumber,Size}
The result will look like this.
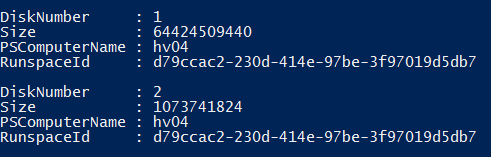
The disk with DiskNumber 1 is 60 GB and the disk with DiskNumber 2 is 1 GB. The 60 GB disk will host the virtual machine files and the 1 GB disk will be the cluster disk witness.
The recommended filesystem for disks that will host virtual machine files, is the Resilient FileSystem (ReFS). For the cluster disk witness , NTFS is used.
To initialize and format the 60 GB disk, use the following command.
Invoke-Command -ComputerName HV04 {Initialize-Disk –Number 1 –PartitionStyle GPT –PassThru | New-Partition –UseMaximumSize | Format-Volume -FileSystem ReFS}
To initialize and format the 1 GB disk, use the following command.
Invoke-Command -ComputerName HV04 {Initialize-Disk –Number 2 –PartitionStyle GPT –PassThru | New-Partition –UseMaximumSize | Format-Volume -FileSystem NTFS}
Add and configure cluster disks
To check if the disks are ready to be added as cluster disks, use the following command.
Get-ClusterAvailableDisk -Cluster hvcluster01
The result will look like this.
To add both disks as clusterdisks, use the following command.
Get-ClusterAvailableDisk -Cluster hvcluster01 | Add-ClusterDisk
The result will look like this.

To rename the clusterdisks to more logical names, use the following commands.
(Get-ClusterResource -Cluster hvcluster01 | where Name -eq "Cluster Disk 1").Name = "Quorum Disk"
(Get-ClusterResource -Cluster hvcluster01 | where Name -eq "Cluster Disk 2").Name = "VM Data Disk 01"
The new names can be seen running the following command.
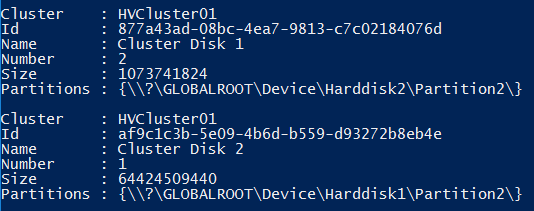
Get-ClusterResource -Cluster hvcluster01 | where {$_.ResourceType -eq 'Physical Disk'}
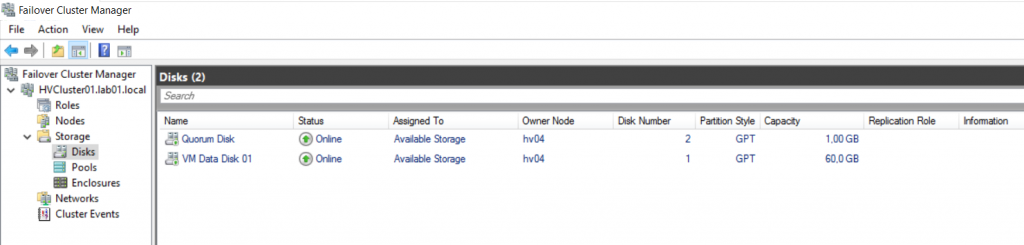
The result will look like this.

You can also see the changed names in the Failover Cluster Manager.
Cluster Shared Volumes
Because both Hyper-V servers need to have access to the ‘VM Data Disk 01’ disk to create, delete and modify virtual machine files concurrently, this disk must be added to Cluster Shared Volumes (CSV).
Cluster Shared Volumes (CSV) is a feature in Windows Server in which shared disks are concurrently accessible to all nodes within a failovercluster.
To add the ‘VM Data Disk 01’ disk to the CSV, use the following command.
Get-ClusterResource -Cluster cluster01 | where Name -eq "Data Disk 01" | Add-ClusterSharedVolume
The result is that on all Hyper-V servers, the disk is set to Online and is mounted to a folder named ‘C:\ClusterStorage\Volume1’. All files (e.g. virtual machine files) that are placed in this folder, are accessible to all Hyper-V servers.
To change the default location for virtual machine files and virtual hard disks, use the following commands.
Set-VMHost -ComputerName $ServerList -VirtualMachinePath 'C:\ClusterStorage\Volume1\Hyper-V\VMs'
Set-VMHost -ComputerName $ServerList -VirtualHardDiskPath 'C:\ClusterStorage\Volume1\Hyper-V\Virtual Hard Disks'
The folders ‘..\Hyper-V\VMs’ and ‘..\Hyper-V\Virtual Hard Disks’ are created if they don’t exist.
Cluster Quorum
A (Hyper-V) cluster generally requires more than half the nodes to be running, which is known as having the quorum.
Quorum is designed to prevent split-brain scenarios which can happen when there is a partition in the network. The Failover Clustering’s concept of quorum forces only one of the groups of nodes to continue running and stay online. For more information about cluster and pool quorum, check this Microsoft page.
It is generally a good idea to have a Quorum Witness, that can provide an extra vote in case of an even number of nodes.
There are three types of Quorum Witnesses:
- Cloud Witness – Blob storage in Azure
- File Share Witness – A SMB file share on a file server running Windows Server
- Disk Witness – A small clustered disk which is in the Cluster Available Storage Group
To use the 1 GB disk that is in the Cluster Available Storage Group, use the following command to configure it as a Quorum Witness.
Set-ClusterQuorum -Cluster hvcluster01 -NodeAndDiskMajority "Quorum Disk"
Virtual Switch
For virtual machines to communicate to other (virtual) machines, a virtual switch is required. If virtual machines only need to communicate with other virtual machines on the same node, an internal switch can be created. If the virtual machines also need to communicate with (virtual) machines outside the Hyper-V node, an external virtual switch is required.
To create an external virtual switch named ‘VirtualSwitch_EXT01’ using networkadapter ‘Ethernet0’ on both nodes, use the following command.
New-VMSwitch -ComputerName $ServerList -Name 'VirtualSwitch_EXT01' -NetAdapterName Ethernet0 -AllowManagementOS $true -Notes 'Parent OS, VMs, LAN'
To create an internal switch named ‘VirtualSwitch_INT01’ on both nodes, which is not very useful on a Hyper-V cluster because VMs can move between nodes, use the following command.
New-VMSwitch -ComputerName $ServerList -Name 'VirtualSwitch_INT01' -SwitchType Internal -Notes 'VMs'
Conclusion
The Hyper-V cluster is finished. New clustered virtual machines can be added to the cluster as Virtual Machine Role using the Failover Cluster Manager. It is also possible to add existing virtual machines to the cluster as Virtual Machine Role. How to do that with Powershell, will be covered in a future article…
Leave a Reply